Wednesday, December 16, 2009

Simple Constant Power Loads in LTspice

I recently needed to model active and passive power factor correction techniques as part of the design process for a 100 watt offline LED ballast. The LED driver is essentially a constant power load, but, unfortunately, LTspice doesn't include a constant power load element. A quick Google search didn't turn up anything particularly elegant, so I decided to roll my own. Below are two simple constant power loads I came up with. The first is a resistor whose resistance is a function of the voltage across it, and the second is a voltage-dependent current source using a piece-wise linear approximation. Both are bounded to prevent convergence problems. Click for a bigger image.


The resistor-based load is more accurate and works for either polarity. To create it just place a resistor on your schematic, but instead of entering a numeric resistance value you put in a formula, in my example:
R=limit(10,V(v1)**2/100,1000)
Ignoring the limit command for the moment, the resistance is simply V(v1)**2/100, load voltage squared divided by the desired load wattage, in this case 100 watts. The limit command is necessary to constrain the min and max resistance values. The limit function is described, rather tersely but accurately, in the LTspice manual as "limit(x,y,z) - Intermediate value of x, y, and z". The order of the arguments doesn't matter because it really does just take the intermediate value of the three. In my example the limits are 10 and 1000 ohms.

Although the voltage dependent current source based load is not as accurate as the resistor based load, it offers more flexibility. The example I show is a constant power load, but you can use the table concept to define arbitrary load functions. To create it, just place a voltage dependent current source, listed as "g" in LTspice's component menu, on your schematic. Right click on the current source's value, which will be shown as "G", and enter your table. The table consists of pairs of voltages and currents separated by commas. It's a good idea to have your first pair be (0 0) so that the current goes to zero at zero volts. In the constant power case the voltage times the current of all of the other pairs is your desired load power. Here's my 100 watt example:
table = (0 0, 25 4, 50 2, 75 1.333, 100 1, 125 0.8, 150 0.667, 175 0.572, 200 0.5)
Notice that after the first pair each subsequent pair multiplies to 100. You should choose voltages to cover your entire anticipated operating range, and have enough pairs so that the interpolation error is acceptable. My operating range is roughly 50 to 175 volts, so my table covers 25 to 200 volts to provide a little margin. With eight pairs (not counting the first) the error over the operating range is a few percent.

To get accurate simulations with nonlinear elements, like these loads, you must keep your time steps small. I found that the default LTspice .tran settings resulted in obvious artifacts, and that to get reasonably clean results with a 60Hz voltage source I needed to set to set the .tran maximum timestep to around 10uS.

Below are plots showing the behavior of both loads when driven by a 120VAC 60Hz sine wave. Click for a bigger image. The resistor load, on top, works for both polarities. The voltage controlled current source load, at the bottom, only works for positive voltages. The table interpolation errors are visible as ripple in the power level, particularly at lower voltages.


If you'd like more information about constant power loads, this thread on the LTspice Yahoo group is a good place to start.

Thursday, July 2, 2009

Mauna Kea - IRTF - Hawaii Pictures

One of the things I've done as an electrical engineering consultant is to design and build drive and data acquisition systems for many of the infrared cameras and spectrometers used by astronomers around the world. So every now and then I get invited to go on an observing run with one of the groups using my equipment. Right now I'm on Mauna Kea with a team of astronomers from NASA Goddard who are using NASA's Infrared Telescope Facility (IRTF) to study carbon chemistry on Jupiter.

Mauna Kea is on the island of Hawaii, usually just called the Big Island. The top of Mauna Kea, at 13,800 feet, is anything but tropical. It snows here during the winter, and nighttime temperatures even in the summer are around freezing. We've been watching the last little snow patch at the summit melt over the past few days, but it's lasted into July!


After I landed in Hilo we had to kill a couple of hours waiting for another team member to arrive, so we went down to Hilo Bay. It was packed with locals watching traditional Hawaiian canoe races. There were lots of fiberglass canoes on shore, but it looked like they only used hand-made wooden canoes for racing. Beautiful boats! The picture below shows one of the racing canoes being loaded on a trailer.


You can see several of the Mauna Kea telescopes peaking above the clouds in this picture which I took from Hilo Bay. The distance to Mauna Kea's summit is about 25 miles horizontally and three miles vertically. Click on any of these pictures to see full size versions.


This is Hale Pohaku (Stone House), the dorms and support buildings for the Mauna Kea observatories, as seen from the top of a nearby pu'u (hill or cinder cone) which I climbed. This cone may be Pu'ukalepeamoa, but I'm not sure. I stayed in dorm B, which is the smaller building just to the right and above the main building. The dorm rooms are spartan, but they have private baths, and you don't spend much time in them anyway. Hale Pohaku is at 9300 feet, which is a fairly comfortable altitude, although you certainly notice it if you climb a steep pu'u. The main building has offices, a cafeteria, rec rooms, and the laundry. The road up to Hale Pohaku is paved, but most of the road to the summit isn't.


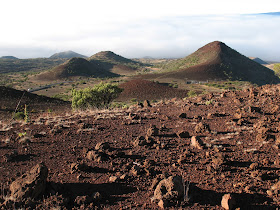
This is the pu'u that I climbed to take the picture of Hale Pohaku. It's a few hundred feet tall. I took this picture shortly after sunrise, and it really is that red. There are around a hundred pu'us on Mauna Kea, and this one is fairly typical of those at higher altitudes where there isn't a lot of plant cover.


This is the view looking southeast from the top of the pu'u. The road to Hale Pohaku is on the left, and the eastern slope of Mauna Loa is visible above the clouds on the right. Eight or nine other pu'us are visible, and each was an active volcanic cone at some time.